tow TESLA MODEL S 2017 (UK) User Guide
[x] Cancel search | Manufacturer: TESLA, Model Year: 2017, Model line: MODEL S, Model: TESLA MODEL S 2017Pages: 186, PDF Size: 4.67 MB
Page 74 of 186

To resume cruising at the previously set
speed, briefly pull the cruise control lever
toward you.
Note: Depending on date of manufacture,
some Model S vehicles have a button on the end of the cruise control lever. Pressing this
button when cruise control is active cancels
cruise control.
Note: When
Traffic-Aware Cruise Control
cancels, Model S does not coast. Instead,
regenerative braking slows down Model S in
the same way as when you move your foot
offthe accelerator when driving without cruise
control (see Regenerative Braking on page
58).
Warning: Traffic-Aware Cruise Control
cancels, or may not be available, in the
following situations:
Page 76 of 186

Note: Autosteer is a BETA feature.
If Model S is equipped with Driver Assistance
components (see About Driver Assistance on
page 68), and you have purchased the
optional Autopilot Tech Package, you can use
Autosteer to manage steering and speed under certain circumstances. Autosteer builds
upon
Traffic-Aware Cruise Control,
intelligently keeping Model S in its driving lane
when cruising at a set speed. Using the
forward looking camera, the radar sensor, and
the ultrasonic sensors, Autosteer detects lane
markings and the presence of vehicles and
objects, assisting you in steering Model S
based on the lane markings and the vehicle
directly in front of you.
Warning: Autosteer is a hands-on feature.
You must keep your hands on the steering
wheel at all times.Warning: Autosteer is intended for use
only on highways and limited-access
roads with a fully attentive driver. When using Autosteer, hold the steering wheel
and be mindful of road conditions and
surrounding
traffic. Do not use Autosteer
on city streets, in construction zones, or
in areas where bicyclists or pedestrians
may be present. Never depend on
Autosteer to determine an appropriate driving path. Always be prepared to take
immediate action. Failure to follow these instructions could cause serious property
damage, injury or death.
Operating Autosteer
Before you can operate Autosteer, you must
enable it by touching Controls > Settings > Driver Assistance > Autosteer > Enable .
To indicate that Autosteer is available (but not actively steering Model S), the instrument
panel displays a gray Autosteer icon on the right side of the driving speed as shown here:
To initiate Autosteer, pull the cruise control
lever toward you twice in quick succession. Autosteer
briefly displays a message on the
instrument panel reminding you to pay
attention to the road and have your hands on
the steering wheel. To indicate that Autosteer
is now actively assisting in steering Model S, the instrument panel displays the Autosteericon in blue. When Autosteer is able to detectlane markings, it also displays the driving lane
in blue:
Note: In situations where Autosteer is unable
to detect lane markings, the driving lane is
determined based on the vehicle you are
following. In these situations, the car in front
of you is highlighted in blue.
Note: To initiate Autosteer, you must be
driving at least 5 mph (8 km/h) on a roadway
with visible lane markings. If a vehicle is
detected ahead of you, you can initiate
Autosteer at any speed, even when stationary.
Note: In most cases, Autosteer attempts to
center Model S in the driving lane. However, if
the sensors detect the presence of an obstacle (such as a vehicle or guard rail), Autosteer
may steer Model S in a driving path that is
offset from the center of the lane.
Note: In situations where you attempt to
engage Autosteer, but you are not driving
within the required driving speed for Autosteer to operate, or Autosteer is not
receiving adequate data from the camera or
sensors, a message displays on the instrument
panel indicating that Autosteer is temporarily
unavailable.
Autosteer
76Model S Owner
Page 99 of 186

1. CloseTouch the circled X in the top left corner of a window to close it (or you can touch anywhere
outside the window).
2. Sunroof
If Model S is equipped with a sunroof, touch to adjust its position (see Sunroof on page 15).
3. Suspension
If Model S is equipped with Smart Air Suspension, touch to manually raise or lower Model S, orto remove a previously saved auto-raising location (see Smart Air Suspension on page 110).
Model S must be powered on and you must press the brake pedal before you can change
suspension settings. Smart Air Suspension causes Model S to self-level, even when powered
off. Therefore, when towing or lifting, you must disable self-leveling (see Instructions for
Transporters on page 173 and Jacking and Lifting on page 157).
4. Driving
Page 108 of 186

VentilationOutside air is drawn into Model S through the
grill in front of the windshield. Keep the grill
clear of obstructions such as leaves and snow.
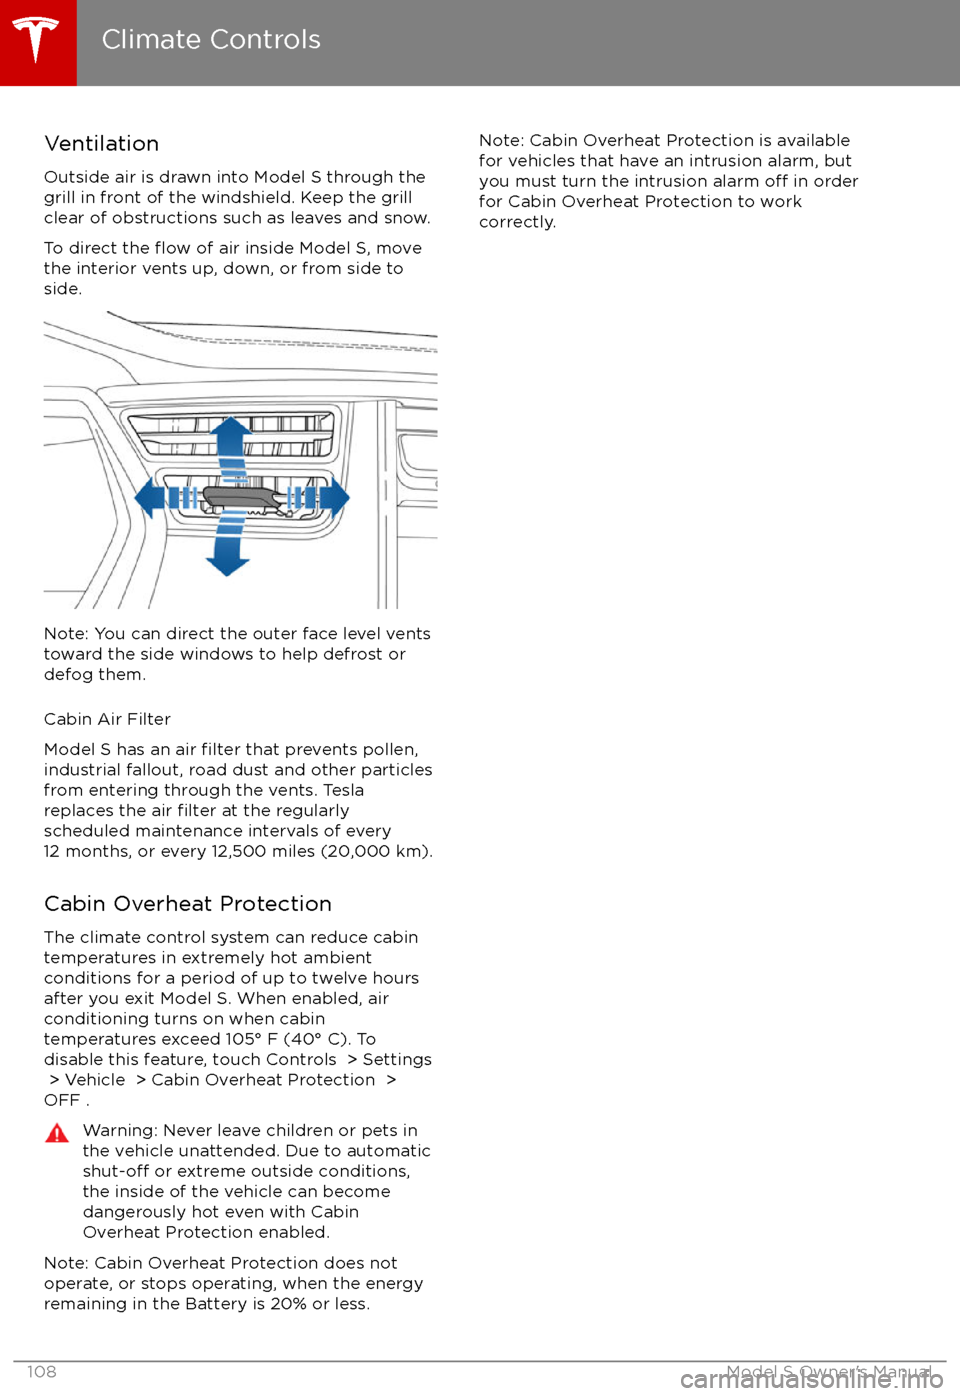
To direct the
flow of air inside Model S, move
the interior vents up, down, or from side to
side.
Note: You can direct the outer face level vents
toward the side windows to help defrost or
defog them.
Cabin Air Filter
Model S has an air
filter that prevents pollen,
industrial fallout, road dust and other particles
from entering through the vents. Tesla
replaces the air
filter at the regularly
scheduled maintenance intervals of every
12 months, or every 12,500 miles (20,000 km).
Cabin Overheat Protection
The climate control system can reduce cabin temperatures in extremely hot ambientconditions for a period of up to twelve hours
after you exit Model S. When enabled, air conditioning turns on when cabin
temperatures exceed 105
Page 125 of 186

About the Security System
If Model S does not detect a key nearby and a
locked door or trunk is opened, an alarm sounds and headlights and turn signals
flash.To deactivate the alarm, press any button on the key.
To manually enable or disable the alarm
system, touch Controls > Settings > Safety &
Security > Alarm . When set to on, Model S
activates its alarm one minute after the doors
lock and a recognized key is no longer
detected nearby.
If Model S is equipped with the optional
security package, it includes a battery-backed
siren that sounds instead of the horn in situations where a locked door or trunk isopened and Model S does not detect a key
nearby. If the Tilt/Intrusion setting is on, the siren also sounds if Model S detects motioninside the cabin, a window is broken, or if it is
moved or tilted (for example, with a tow truck
or jack). To turn the tilt/ intrusion detection systems on or
off, touch Controls > Settings
> Safety & Security > Tilt/Intrusion .
Note: If you plan to leave something that
moves, such as a dog, inside your locked
Model S, remember to turn
off the tilt/
intrusion system. Any type of motion detected
inside Model S activates the siren.
Note: To turn on Tilt/Intrusion, the Alarm must
be ON.
Security Settings
Using the Touchscreen125
Page 154 of 186

Removing the Maintenance Panel
To check
fluid levels, remove the maintenance
panel:
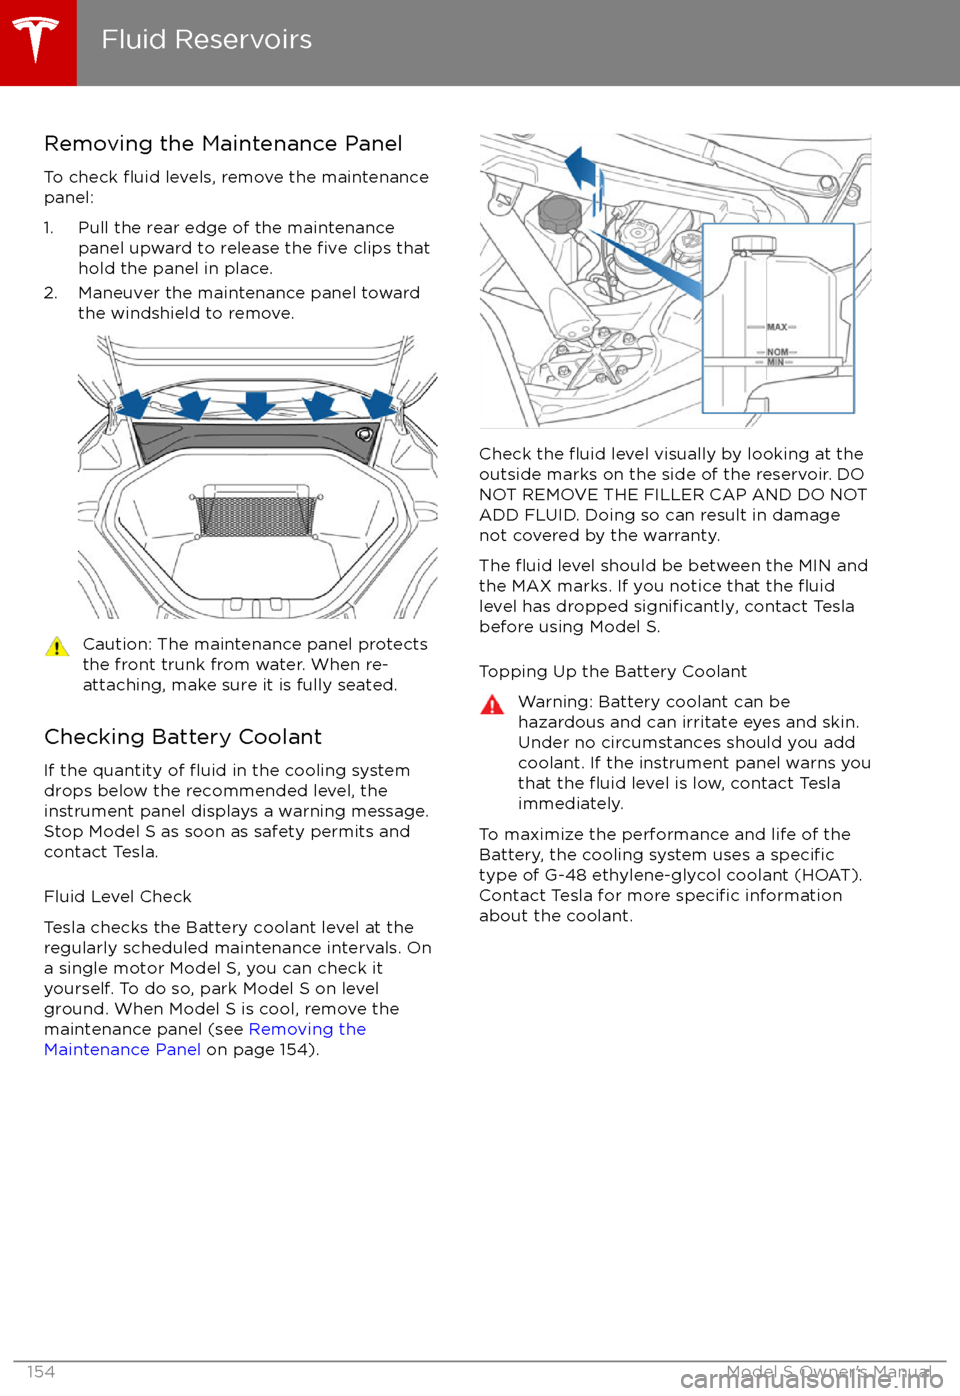
1. Pull the rear edge of the maintenance panel upward to release the
five clips that
hold the panel in place.
2. Maneuver the maintenance panel toward the windshield to remove.
Caution: The maintenance panel protects
the front trunk from water. When re-
attaching, make sure it is fully seated.
Checking Battery Coolant
If the quantity of
fluid in the cooling system
drops below the recommended level, the
instrument panel displays a warning message.
Stop Model S as soon as safety permits and
contact Tesla.
Fluid Level Check
Tesla checks the Battery coolant level at the
regularly scheduled maintenance intervals. On a single motor Model S, you can check it
yourself. To do so, park Model S on level
ground. When Model S is cool, remove the
maintenance panel (see Removing the
Maintenance Panel on page 154).
Check the fluid level visually by looking at the
outside marks on the side of the reservoir. DO
NOT REMOVE THE FILLER CAP AND DO NOT
ADD FLUID. Doing so can result in damage
not covered by the warranty.
The
fluid level should be between the MIN and
the MAX marks. If you notice that the fluidlevel has dropped significantly, contact Tesla
before using Model S.
Topping Up the Battery Coolant
Warning: Battery coolant can be
hazardous and can irritate eyes and skin.
Under no circumstances should you add
coolant. If the instrument panel warns you
that the
fluid level is low, contact Tesla
immediately.
To maximize the performance and life of the
Battery, the cooling system uses a specifictype of G-48 ethylene-glycol coolant (HOAT).
Contact Tesla for more specific information
about the coolant.
Fluid Reservoirs
154Model S Owner
Page 163 of 186

Cargo VolumeTotal cargo volume (rear seats not
folded)28.4 cu ft804.2 LRear cargo volume26.3 cu ft744.7 LRear cargo volume (with seats
folded down)58.1 cu ft1645.2 LFront cargo volume2.1 cu ft59.5 L
Weights
Curb Weight* - 60/70/754469 lbs2027 kgCurb Weight* - 60D/70D/75D4647 lbs2108 kgCurb Weight* - 90D4736 lbs2148 kgCurb Weight* - P90D4841 lbs2196 kgCurb Weight* - P100D4941 lbs2241 kgGVWR** - 60/70/755710 lbs2590 kgGVWR** - 60D/70D/75D5732 lbs2600 kgGVWR** - 90D5820 lbs2640 kgGVWR** - P90D5886 lbs2670 kgGVWR** - P100D5997 lbs2720 kgGross Axle Weight Rating- Front
(non-Performance vehicle)2813 lbs1276 kgGross Axle Weight Rating- Front
(P85D/P90D)2756 lbs1250 kgGross Axle Weight Rating- Front
(P100D)2866 lbs1300 kgGross Axle Weight Rating - Rear: 19"
wheels3307 lbs1500 kgGross Axle Weight Rating - Rear: 21"
wheels3131 lbs1420 kgTrailer TowingNot permissible*Curb Weight = weight of the vehicle with correct fluid levels, no occupants and no cargo
**GVWR = Gross Vehicle Weight Rating
Dimensions and Weights
Specifications163
Page 173 of 186

Use a Flatbed OnlyUse a
flatbed trailer only, unless otherwisespecified by Tesla. Do not transport Model S
with the tires directly on the ground.
Caution: Damage caused by transporting is not covered by the warranty.Caution: To transport Model S, follow theinstructions exactly as described next.
Disable Self-Leveling (air
suspension vehicles only)
If Model S is equipped with Smart AirSuspension, it automatically self-levels, even
when power is
off. To prevent damage, you
must activate Jack mode to disable self- leveling:
1. Touch Controls > Suspension on the touchscreen.
2. Press the brake pedal, then touch Very High to maximize height.
3. Touch Jack.
When Jack mode is active,
Model S displays this indicator
light on the instrument panel,
along with a message telling you
that active suspension is
disabled.
Note: Jack mode cancels when Model S is
driven over 4.5 mph (7 km/h).
Warning: Failure to activate Jack mode on
a Model S equipped with Smart Air Suspension can result in the vehicle
becoming loose during transport, which
may cause
significant damage.
Activate Tow Mode
Model S may automatically shift into Park
when it detects the driver leaving the vehicle,
even if it has previously been shifted into Neutral. To keep Model S in Neutral (which
disengages the parking brake), you must use
the touchscreen to activate Tow mode:
1. Shift into Park.
2. Press the brake pedal, then on the touchscreen, touch Controls > Settings >
Service & Reset > Tow Mode .When Tow mode is active, Model S
displays this indicator light on the
instrument panel, along with a
message telling you that Model S is
free-rolling.
Note: Tow mode cancels when Model S is
shifted into Park.
Caution: If the electrical system is not
working, and you therefore cannot release
the electric parking brake, attempt to
quick start the 12V battery. For
instructions, call Tesla. If a situation
occurs where you cannot disengage the
parking brake, use tire skids or transport Model S for the shortest possible distance
using wheeled dollies. Before doing so,
always check the dolly manufacturer
Page 174 of 186

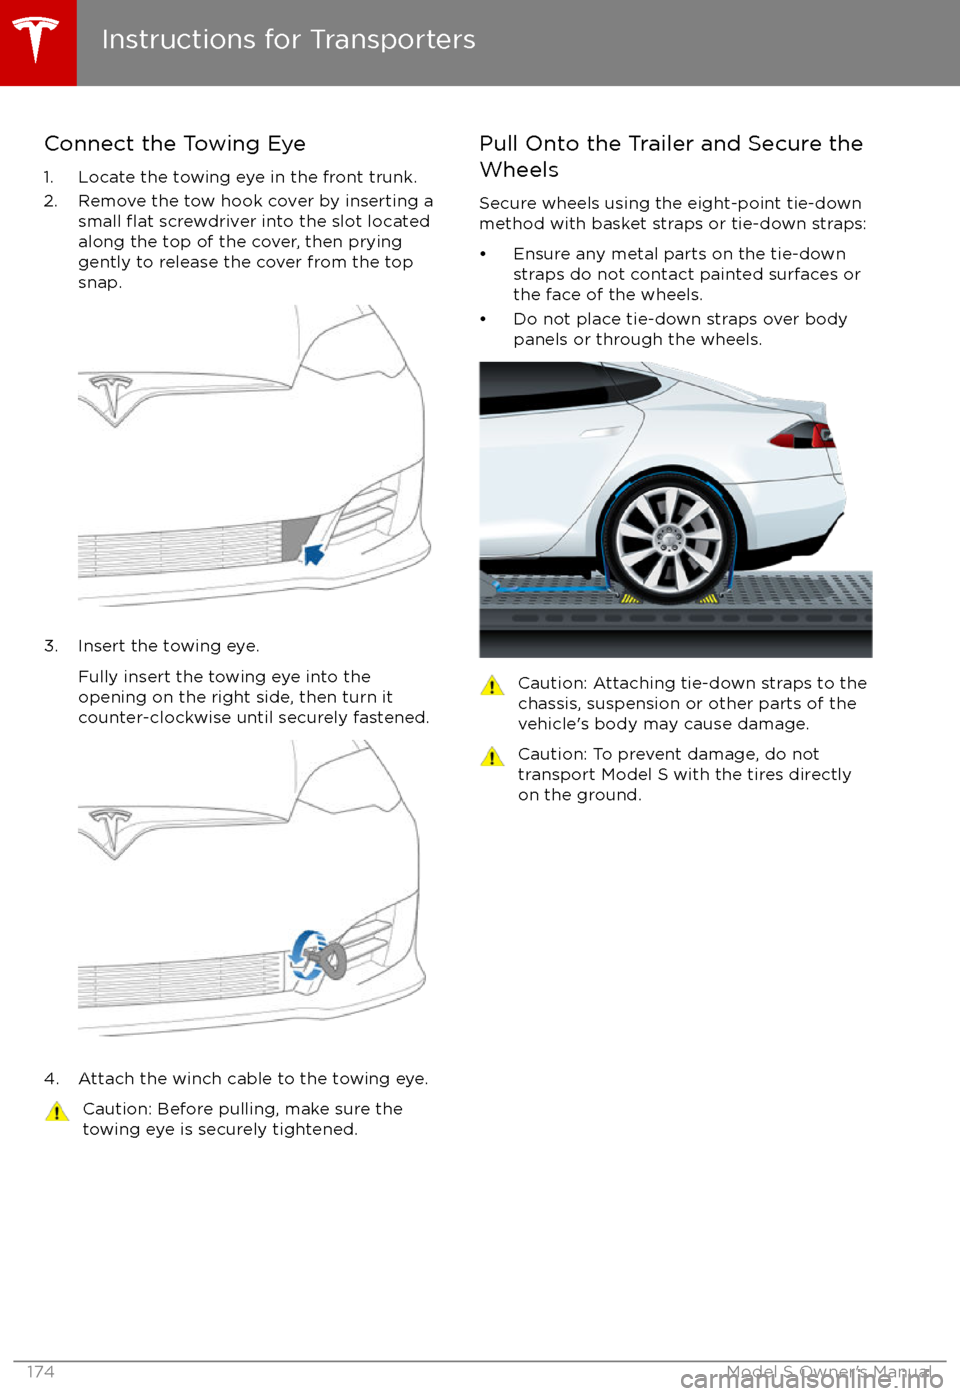
Connect the Towing Eye1. Locate the towing eye in the front trunk.
2. Remove the tow hook cover by inserting a small
flat screwdriver into the slot located
along the top of the cover, then prying
gently to release the cover from the top
snap.
3. Insert the towing eye.
Fully insert the towing eye into the
opening on the right side, then turn it
counter-clockwise until securely fastened.
4. Attach the winch cable to the towing eye.
Caution: Before pulling, make sure the
towing eye is securely tightened.Pull Onto the Trailer and Secure the
Wheels
Secure wheels using the eight-point tie-downmethod with basket straps or tie-down straps:
Page 185 of 186

steering wheeladjusting position 39
adjusting sensitivity 39
buttons 39
heated 39
scroll bars 39
steering, automatic 76
summer tires 142
Summon 81
sunroof 15
suspension 111
suspension
specifications 165
T
telematics 177
temperatureBattery (high voltage), limits 133
cabin, controls for 105
heated steering wheel 41
outside 45
tie-down straps 174
tilt detection 125
Tire and Loading Information label 160
tire noise 142
Tire Pressure Monitoring SystemFCC certification 180
overview of 143
tire pressures, checking 139
tire repair kitinflating with air only 147inflating with sealant 146
replacing the sealant canister 148tiresall-season 142
balancing 140
chains 142
inspecting and maintaining 140
pressures, how to check 139
replacing 141
replacing a tire sensor 143
rotation 140
specification 167
summer 142
tire markings 168
tire sealant 145
winter 142
toll system transponders, attaching 158
tolls, avoiding 120
torque
specifications 164
touch up body 151
touchscreenclean mode 150
cleaning 150
Controls 98
overview 93
Settings 101
software updates 129Tow mode 173
towing 173
towing a trailer 161
towing eye, locating 174
towing instructions 173TPMSFCC certification 180
overview of 143
traction control 59
trademarks 175, 176
Traffic-Aware Cruise Control 70Traffic-Based Routing 120
trailer hitches 161
transmission
specifications 164
transponders, attaching 158
transporting 173
trip chart 65
trip meter 64
trip overview 120
trip planner 120
trunk, front 12
trunk, rearchild protection lock 7
disabling interior handle 7
TuneIn radio 114
turn signals 54
Typical range 101
U ultrasonic sensors 68
Unlock on Park 4
unlockingtrunk, front 12
trunk, rear 10
unlocking and locking doors 4
unlocking when key doesn